


Review Updated for Editor Build 5.5.313.1
This free PDF Viewer (current version is 2.5.313.1) and Editor (5.5.313.1) is an excellent alternative to Adobe Reader. It has some very nice features not found in Adobe Reader, but where it matters it follows the familiar shortcuts and layout of the established market leader. It is very customisable too, so if you don’t like the defaults, many things can be modified.
The 64-bit installer is 57.3 Mbytes and when installed the program takes 134 Mbytes on disk, compared to 172 Mbytes for Adobe Reader 11.0.0.11
The PDF Help Manuals are available as a separate download to reduce the size of the installer, or you can use the online help system (select the appropriate product to find the PDF manuals too).
The developers continue to add new features and fix bugs, releasing regular updates. Their responsiveness to user feedback via the support forum is exemplary. Reported bugs are often fixed in the next release.
The free PDF-XChange Editor replaces the free viewer. It has most, but not all of the features of the viewer. You can keep both installed until all the features that you need are included in the Editor. In my tests, the editor was significantly faster.
My review below, originally written for the free Viewer, retains those sections for features in the Viewer that are not yet available in the Editor. The screen shots should make it obvious which version is being referred to as the old ones were taken on Windows XP.
 Recent Changes
- Customise User Interface fonts and colours
- Add new toolbars
- JPEG2000 Image support
- Inertial scroll for hand tool
- Text styles for popup notes
- Open links in new tab in browsers
- Exclusive mode for most tools
- Add external applications to Launch Toolbar
- Critical Bug with the Shell Extension was fixed.
- Full History of Changes
Professional Edition
 The
professional and free versions are the same program. Features in the free
version, such as adding comments and highlighting, can be used without any
watermark being added. The professional features are also available in the free
version, but documents are saved with a watermark until it is registered. A
warning dialogue is shown if you attempt to use the professional features in the
free version. Either cancel the action, or don’t save the document to avoid
adding watermarks, which cannot be removed later. The Pro features can be hidden
in the free version from Edit, Preferences, Registration.
The
professional and free versions are the same program. Features in the free
version, such as adding comments and highlighting, can be used without any
watermark being added. The professional features are also available in the free
version, but documents are saved with a watermark until it is registered. A
warning dialogue is shown if you attempt to use the professional features in the
free version. Either cancel the action, or don’t save the document to avoid
adding watermarks, which cannot be removed later. The Pro features can be hidden
in the free version from Edit, Preferences, Registration.
- Headers and Footers can be added
- Watermarks can be added
- Backgrounds can be added
- Page numbering can be added
- Pages can be inserted
- Pages can be extracted to a new PDF file
- Pages can be deleted
- Pages can be cropped
- Bookmarks can be Inserted, Deleted, Renamed, or Edited (free version)
- Crop or Resize Pages
- Rotate Pages (free version)
- Digital Signing of documents
- Mark text for redaction (conceal from view)
- OCR Pages (convert scanned images to text)
- Launch document in Adobe Reader, Foxit Reader, or other installed PDF viewers (free version)
- Summarise Comments (free version of Editor)
- Flatten All Comments
Editing Security Settings
If a document is not secured, or if you know the password, security settings can be changed to allow or disallow opening, commenting, printing, copying, etc.
In the Viewer, security options can be changed in Preferences, in the Editor, they can be changed in Document Properties, Security.

When a secure document is open in the Editor, a padlock icon is shown on the Tab Bar indicating that there are some restrictions on modifying the content. The viewer indicates it by appending [SECURED] to the filename in the Tab Bar. No preview thumbnail is shown for PDF files that need a password to be opened.
The Viewer also allows the user to set notification levels for launching executables or opening attachments from a PDF file.
You can also add a digital signature from the Document menu. This is a Pro feature that will add a watermark to files if you save them from the unregistered version.
Find Text in PDF Files
 Open
the Search Pane to find text in the current document, all open documents, or
documents in folders on your hard drive. In my tests, PDF-XChange was about
seven times faster than Adobe Reader searching for a common word in a 1,180 page
test document — 10 copies of a 118 page book, created just to test the
performance of PDF Viewers — and nearly five times faster searching eight
folders containing 344 PDF files. The hardware used was a Novatech
Life NTA25.
Open
the Search Pane to find text in the current document, all open documents, or
documents in folders on your hard drive. In my tests, PDF-XChange was about
seven times faster than Adobe Reader searching for a common word in a 1,180 page
test document — 10 copies of a 118 page book, created just to test the
performance of PDF Viewers — and nearly five times faster searching eight
folders containing 344 PDF files. The hardware used was a Novatech
Life NTA25.
- PDF-XChange Viewer 2.5.308.2 found 710 entries in 0:01
- PDF-XChange Editor 5.5 build 313 found 710 entries in 0:03
- Foxit Reader 7.0.3.916 found 710 entries in 0:06
- Adobe Reader 11.0.11 found 710 entries in 0:14
Searching for a word in 8 folders of 369 documents
My personal collection of PDF documents, some of which may contain the search string several times, while others may not contain it at all. Most of the test set doesn’t change.
- PDF-XChange
Viewer found 3371 entries in 102 documents in 1:08
(including page content, document information, bookmarks, and comments) - PDF-XChange Editor found 3314 entries in 97 documents in 1:36
- Foxit Reader found 3,138 entries in 96 documents in 5:05 (much slower than earlier versions)
- Adobe Reader found 3404 entries in 102 documents in 7:10
 There is
a wide range of options for advanced search (shortcut = Ctrl+Shift+F) of
multiple PDF documents. The Proximity search lets the user specify whether to
find only adjacent words, words in the same paragraph, page, or document.
There is
a wide range of options for advanced search (shortcut = Ctrl+Shift+F) of
multiple PDF documents. The Proximity search lets the user specify whether to
find only adjacent words, words in the same paragraph, page, or document.
 To
highlight the first, second, and subsequent words in the search string that have
been found, the Coloured Search Results option display them in different
colours. This may be overkill for ordinary users, but for those who have to
trawl through large collections of PDF files it may be extremely useful. It’s
certainly a big improvement on the Advanced Search in Adobe Reader, though the
colours and highlighting need some refinement.
To
highlight the first, second, and subsequent words in the search string that have
been found, the Coloured Search Results option display them in different
colours. This may be overkill for ordinary users, but for those who have to
trawl through large collections of PDF files it may be extremely useful. It’s
certainly a big improvement on the Advanced Search in Adobe Reader, though the
colours and highlighting need some refinement.
Shortcuts F4 and Shift F4 will find the next and previous search results. These can be customised if you prefer to use the Adobe Reader defaults of Ctrl G and Ctrl Shift G. Personally, I find F4 more intuitive since F3 and Shift F3 are used for find in page. I never noticed the Adobe Reader shortcuts before.
PDF-XChange build 2.0.43 or later can find ligatures used in OpenType fonts. New in build 2.5.202 is an option in Preferences, Page Display to expand common ligatures to text on copy.
Read Aloud
The Editor can read selected text using a computer generated voice with an American accent. It works, but it’s not 100% accurate so some words are hard to understand.
Optical Character Recognition
The process takes a few minutes — perhaps 15 seconds per page — but the resulting document is then searchable without any obvious visible change to the document, and without much increase in file size. A typical 20 page PDF of 5.18 Mbytes was 5.4 Mbytes after OCR and saving as a new document. Recognition was accurate, except on some small text. This feature is available in the free version of the viewer and the editor. No watermarks are added when using it.
 Search Providers
This feature is now available in the Editor build 5.5.310. It may be useful, but I have seldom used it in earnest, although I frequently use a similar feature from my browser.
Text selected in the PDF file can be searched using any of the default search providers: Bing, Google, Live Search, Meta UA (Ukrainian), Wikipedia (en), Yahoo, RandexRU (Russian).
To add a custom search, search for the word “TEST” in your desired search engine, copy the URL and paste it into the New search dialogue from Preferences, Search Providers, New…
Searches can be moved up or down the list, or removed permanently.
I have added a custom search for the Pali Text Society Dictionary.
The Loupe
 This
is a zoom window that shows a magnified view of the page beneath a transparent
rectangle that can be dragged around the page.
This
is a zoom window that shows a magnified view of the page beneath a transparent
rectangle that can be dragged around the page.
Click the buttons to change the current zoom level. Click on the camera icon to take a snapshot of the zoomed area. The loupe window can be resized and positioned anywhere on the monitor, even outside of the PDF-XChange window, so if you have a wide-screen monitor you will find this feature even more useful.
Resizing the loupe window simultaneously resizes the transparent rectangle. Resizing the rectangle changes the zoom level in the loupe window. Moving the transparent rectangle pans the view in the loupe window.
 The Pan
and Zoom Tool
The Pan
and Zoom Tool
This is another very convenient way to view magnified documents. It is the reverse of the loupe.
If you zoom in on the main window so that the page is bigger than the window, the Pan and Zoom Tool shows a thumbnail of the page, with a transparent rectangle that you drag around to pan the document in the main window. The Pan and Zoom navigator can be resized and positioned anywhere on the monitor.
It has buttons for navigating the document pages, zoom buttons, and a drop list for selecting the zoom level. The Camera icon will take a snapshot of the zoomed area. Resizing the transparent rectangle will change the zoom level in the main document window and simultaneously change the viewed area.
Preview Thumbnails
 The recently
opened files drop-down list displays a thumbnail of the selected file with
information about the file beside it. If you have many files with similar names,
this helps to find the right one.
The recently
opened files drop-down list displays a thumbnail of the selected file with
information about the file beside it. If you have many files with similar names,
this helps to find the right one.
In the File Open dialogue, the PDF file details are shown in the Tooltip.
Page Thumbnails
Page thumbnails can be shown in a panel at any edge of the screen or in a floating window. The thumbnails can be resized and displayed in several columns if you have the space to spare. Shortcut Ctrl+T will show/hide the panel.
 When viewing
PDF documents in single page mode, using the Viewer, when you drag on the scroll
handle, a thumbnail of the current page pops up by the side of the scroll bar
and changes to show the page that will be displayed when you release the mouse
button. The orange rectangle shows the view port.
When viewing
PDF documents in single page mode, using the Viewer, when you drag on the scroll
handle, a thumbnail of the current page pops up by the side of the scroll bar
and changes to show the page that will be displayed when you release the mouse
button. The orange rectangle shows the view port.
This is another neat feature in PDF-XChange that helps when browsing long PDF files. Although of limited usefulness when browsing reams of plain text unless you know the page number that you are seeking, if documents contain at least a few pictures, tables, or illustrations, it is a great aid to finding the page that you’re looking for.
Windows Explorer Thumbnails
The Windows shell extension to display thumbnails of PDF files in Windows Explorer. When using thumbnail mode in Windows Explorer, the thumbnails are shown instead of PDF document icons. The installation program offers an option to install the Shell Extension for viewing thumbnails in Windows Explorer. Installation of this extension is the default, but if you decide not to install it, you will lose the option to view PDF thumbnails in Windows Explorer.
Commenting and Mark-up Tools
You can add sticky notes, text boxes, lines, arrows, shapes and text to PDF documents. You can highlight, strikeout, or underline selected text. Comments and mark-up are saved with the document and can be modified or deleted later. No advertising watermarks are added to the PDF file when you save comments and markup.
Latin Extended characters can be used in document markup. If, like me, you need to work in languages other than English, this is very useful.
Undo and Redo text editing and annotation changes with the usual shortcuts (Ctrl Z, Ctrl Y) or use the toolbar buttons. Copy and paste annotations within the same document or between documents.
Clone existing comments by holding down the control key and dragging them to a new location. This currently seems to work with most annotation apart from sticky notes.
 Sticky notes will be
labelled with the user log-in name by default. The name can be changed by adding
a name under log-in name in Preferences, Identity. The properties of
comments and markup can be modified and saved as the default. To save text
defaults, right-click in text, and select “Text Formatting,” “Save as Default
Style for Text Formatting.”
Sticky notes will be
labelled with the user log-in name by default. The name can be changed by adding
a name under log-in name in Preferences, Identity. The properties of
comments and markup can be modified and saved as the default. To save text
defaults, right-click in text, and select “Text Formatting,” “Save as Default
Style for Text Formatting.”
Display of author name and creation date of comments can be disabled in Preferences, Commenting.
Other users can reply to comments or sticky notes using their own ID or name, and a different colour. Comments can have transparency so that the original PDF text is still legible behind the comments when they are open.
Double-click any markup to add a comment about it. A new sticky note comment with the same colour as the markup will point to it.
All comments show a tool tip when the user passes the mouse over the markup.

 Markup has control
points. For example, the callouts have one where the arrow joins the text box.
Drag that to move the arrow to any side of the text box. Drag the other control
points to reshape the text box, or to move the arrow. The cursor will change
when it is positioned over a control point. Use the rotate handle to rotate the
markup, holding down the control key to constrain rotation by 15°
increments.
Markup has control
points. For example, the callouts have one where the arrow joins the text box.
Drag that to move the arrow to any side of the text box. Drag the other control
points to reshape the text box, or to move the arrow. The cursor will change
when it is positioned over a control point. Use the rotate handle to rotate the
markup, holding down the control key to constrain rotation by 15°
increments.
 Toolbar
icons have a tool tip that shows the current default properties for the
commenting tools. Right-click on the markup to edit its properties. The defaults
for all document markup can be edited in the Comments Style Palette, which can
be shown from the Comments menu.
Toolbar
icons have a tool tip that shows the current default properties for the
commenting tools. Right-click on the markup to edit its properties. The defaults
for all document markup can be edited in the Comments Style Palette, which can
be shown from the Comments menu.
 From the
Properties toolbar, blend modes for markup can be selected. This will change the
colour of markup when it is overlayed on different coloured backgrounds.
From the
Properties toolbar, blend modes for markup can be selected. This will change the
colour of markup when it is overlayed on different coloured backgrounds.
The stacking order of markup can also be changed from the context menu.
In the Comments Style Palette, select a tool from the list on the left, click on the large default style tooltip icon on the right, and change the properties from the properties pane at extreme right of the styles palette. The palette and the panes are all resizable.
The toolbars can be hidden like that on the left. Open that using the down arrow to find a button to reset the default styles for the current document (the reset button is hidden by default to make it harder to do this by accident).
To add further markup to existing markup, e.g. to underline text that is already highlighted, hold down the shift key while using the underline tool.
A list of comments and markup in your document is shown in the Comments panel (Control M to show/hide this). Use the panel to find comments, delete them quickly, or change their properties.
N.B. Comments don’t normally print, while markup does if you have not changed the default option to print document and markup on the Print dialogue. Use text boxes or callouts to add markup that are meant to be printed. Comments can be printed by using the advanced print options. They will be printed as they appear on the screen, whether they are opened or closed. Their transparency for printing can be set in the advanced options.
Managing Comments

 From
the Comments pane one can selectively show or hide comments in a document. The
status submenu records the status of the comments.
From
the Comments pane one can selectively show or hide comments in a document. The
status submenu records the status of the comments.
Comments can be flattened using the Pro version, and summarised using the free version. The output format can be PDF, Rich Text Format (*.rtf), plain text, or HTML. Filenames can be created automatically from the PDF file name.
When printing a PDF document, there are options to print the document only, document and markup, document and stamps, or form field data only. Comments can be exported as an XFDF data file, or summarised as a Rich Text File. In the Comments Pane, comments can be sorted in order of page, type, modification date, creation date, author, or colour. Double-click on a comment to locate it. Right-click on a comment to change its Z-order.
Bookmark icons can be hidden, the tree can be expanded or collapsed, the bookmark text can be enlarged/reduced. Right-click on a bookmark for a full list of options — delete, create, etc.
Measuring Tools
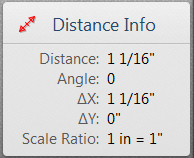
 These
tools allow the user to add dimension lines to PDF drawings. On selecting the
tool, and before drawing a line, you can set the scale using the Properties
toolbar (Control E). In the illustration the scale is set to 1 in = 1 in, but
(in the Editor) you can also set the drawing unit to points, picas, cm, mm, or
pica, and the scaled units to kilometres, metres, decimetres, centimetres,
millimetres, micrometres, nanometres, Ángstrom units, leagues, miles,
mi/yds/ft/in, mi/ft/in, yards, yds/ft/in, foot, ft/in, ft/in/frac, inch,
inch/frac, point, twip, pica, nautical league,
nautical mile, and fathom. When a dimension line is selected, the
Properties Toolbar shows the current scale and measurement. Dimension lines can
be drawn at any angle, the extension lines can be resized, and the label can be
moved. Line weights, line styles, line endings, line colours, line opacity, and
line-endings fill colours can be set.
These
tools allow the user to add dimension lines to PDF drawings. On selecting the
tool, and before drawing a line, you can set the scale using the Properties
toolbar (Control E). In the illustration the scale is set to 1 in = 1 in, but
(in the Editor) you can also set the drawing unit to points, picas, cm, mm, or
pica, and the scaled units to kilometres, metres, decimetres, centimetres,
millimetres, micrometres, nanometres, Ángstrom units, leagues, miles,
mi/yds/ft/in, mi/ft/in, yards, yds/ft/in, foot, ft/in, ft/in/frac, inch,
inch/frac, point, twip, pica, nautical league,
nautical mile, and fathom. When a dimension line is selected, the
Properties Toolbar shows the current scale and measurement. Dimension lines can
be drawn at any angle, the extension lines can be resized, and the label can be
moved. Line weights, line styles, line endings, line colours, line opacity, and
line-endings fill colours can be set.

 There
are also tools for measuring the perimeter or area of elements in the drawing.
All of these measuring tools are available in the free version of
PDF-XChange.
There
are also tools for measuring the perimeter or area of elements in the drawing.
All of these measuring tools are available in the free version of
PDF-XChange.
In Preferences, Measurement, there is an option to show rulers, guides, and grid lines. Annotations such as comments or distance lines can be snapped to the grid or guides for neat alignment.
The spacing, colour, and style of grid lines, and the colour and style of guide lines can be changed.
Guides, grid, and rulers are on the customise dialogue for adding to toolbars or menus, though they currently have no icons — only text, but that can be changed, as can the shortcuts to show hide these new options.
The snapping sensitivity can be set for the different types of annotation, and the snapping points can be selected.
Link Tools
The tools allow the user to add rectangles and quadrilaterals to PDF files with links that jump to other pages in the existing document or to an Internet URL.
 Custom
Stamps
Custom
Stamps
This feature allows you to import images or PDF files to use as custom stamps. Add an image or logo to your documents. Resize stamps and move them easily. Use the properties to make them semi-transparent to use as a watermark. PDF files can contain many pages with one stamp on each page. Because they are vectors, they look sharp at any size. Download my source file to create your own PDF stamps file. This requires Serif™ PagePlus X6, or at least PagePlus X4 or later. Edit the text, change the font, colours, or design, and publish (or print) to PDF to create your own custom stamps PDF source.
Any stamp collection can be hidden from the toolbar drop down. Users can add stamp collections for specific tasks, and hide the stamps that they don’t currently need.
Any image can be pasted from the clipboard as a custom stamp, either directly onto the page, or into the custom stamp palette. If you want transparency though, import a 32-bit image into the stamp palette.
Multiple Document Interface
In the Editor, files can be split horizontally or vertically to show two views on a PDF in the same tab, to view the whole document and a detail at the same time, or a table of contents and any other page.
Adobe Reader, Foxit Reader, and PDF-XChange can all open multiple documents, PDF-XChange Viewer is limited to 50 open documents in each instance. PDF-XChange Editor doesn’t seem to have any limit. Adobe Reader seems to be limited to 50 documents.
To test the speed of loading files from disk, I dragged 50 PDF e-Books from Buddhanet, total 288 Mbytes, to the already open PDF viewer from Windows Explorer.
- PDF-XChange Viewer took 6 seconds. Closing all took less than 1 second.
- PDF-XChange Editor took 3 seconds. Closing all took less than 1 second.
- Foxit Reader took 15 seconds. Exit took took 5 seconds. There is no Close All command that I could see.
- Adobe Reader took 15 seconds. Exit took 3 seconds. There is no Close All command that I could see.
 The
document Navigation Tabs are on by default, but (in the Viewer) you can turn
them off from the view menu to save space.
The
document Navigation Tabs are on by default, but (in the Viewer) you can turn
them off from the view menu to save space.
If they are off, you can switch to other open documents from the Window menu or with the Control Tab shortcut. Drag and drop tabs to change the order on the tab bar. Right-click to show the menu.
To restart with the current open documents next time, change the setting in Preferences, General, Restore last session when application starts.
 To
preview other open documents (using the Viewer), hover the mouse pointer over
the document navigation tabs. The thumbnail shows a preview of the current
document view, the file path (truncated if it is long) and the file name.
To
preview other open documents (using the Viewer), hover the mouse pointer over
the document navigation tabs. The thumbnail shows a preview of the current
document view, the file path (truncated if it is long) and the file name.
The tile icon shows a page of thumbnails with the current view on all open documents (not enabled yet in the Editor). This is another feature that is streets ahead of anything I have seen elsewhere. If you work on multiple PDF documents and constantly have to cross-reference what you were reading earlier, it is so easy to find what you want with just two clicks — one on the tile icon, then one on the appropriate thumbnail. The tile icon can be moved to any toolbar using the customise dialogue, and a shortcut can be assigned to the command: “Show all opened documents tabs.”

The keyboard can also be used to navigate between open documents, even with the navigation tabs displayed. Ctrl Tab will switch to the next open document, while Ctrl Shift Tab will switch to the previous open document. If the Ctrl Tab key is held down for a second, a window pops up showing the document tab thumbnails, letting you preview all of the opened documents to select the right one.
There is an option to turn off the multiple document interface, just in case you like to do things the hard way. You can allow multiple instances of PDF-XChange, or allow only one instance to be active, thus keeping all open documents within one window.
Compact Interface

All of the toolbars can be docked in a single row or expanded to two rows by dragging the bottom. Each toolbar has a left-pointing arrow to collapse it, or a right-pointing arrow to expand. If there is insufficient space to show the text labels, they are hidden. If there is insufficient space for all of the toolbar’s icons, a down-pointing arrow opens a drop-down menu. The screen shot above shows my customised toolbar in PDF-XChange Editor. Even the menu bar can be moved and icons added to it.
The screen shot below shows my customised toolbar in PDF-XChange Viewer. Toolbar icons can be moved, copied to other toolbars, or deleted.
Bookmarks, Comments, Thumbnails | Document properties, Save | File menu, Recent Files, Edit, View, Tools (including Document and Comment menus), Help | Hand tool, Snapshot, Text selection, Export as image, First page, next page, previous page, last page, Undo, Redo

Typewriter, Sticky Note, Highlight, Strikeout, Underline, Arrow, Line, Pencil, Rectangle, Ellipse, Distance, Stamps | Full screen, Fit page, Fit width, Single page, Continuous, Facing, Continuous facing | Help, Check for Updates.
Customisable Interface
 Menus
can be edited or deleted (but not added), icons can be added and moved, and
shortcuts can be assigned to tools and commands or changed in the command
properties dialogue.
Menus
can be edited or deleted (but not added), icons can be added and moved, and
shortcuts can be assigned to tools and commands or changed in the command
properties dialogue.
To start customising, select Customise Toolbars from the View, Toolbars submenu. Select the commands tab to edit the shortcuts. Select any command to edit its properties. Start by assigning a shortcut key to the Customise Toolbars command itself, then you can quickly refine your custom setups as you get used to the interface. The dialogue will show a warning if it is already assigned to another command.
Add customised shortcuts to show facing-pages and show the cover page on the right. These shortcuts will also work in Fullscreen mode, which on a wide-screen monitor offers the best use of screen real-estate for reading books.
If you have spent some time getting things just right, save your work by Exporting all PDF-XChange settings from the Edit menu.
The screen shot (to fit this web page) shows a small window with two PDF files loaded. The menu toolbar is docked at the bottom. Some buttons for navigation and viewing are on the same toolbar — the down arrow will display the icons in a flyout.
 The page
dimensions popup in the bottom left corner on mouse-over (a neat
feature).
The page
dimensions popup in the bottom left corner on mouse-over (a neat
feature).
Tabs can be detached from the main window by dragging, or grouped with other tabs. Tabs can be split horizontally or vertically to provide two views of the same document. There are so many ways to rearrange tabs and tab groups, that I have not figured them out yet. On a 1280 x 1024 monitor, there’s not much to be gained from working with more than one or two tabs at once, but users with large monitors, or multiple monitor setups will find many different ways to configure the workspace.
The two icons to the left of the first tab — show tab thumbnails, and show sorted tabs — don’t seem to be functional yet. The first icon can be used to drag tab groups out of the window.
Customize UI
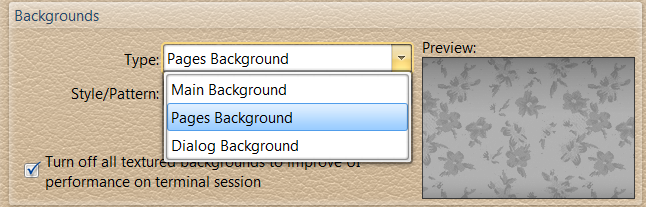
The main (workspace) background, the page background, and the dialogue background can be modified.
Select different fonts for menus and toolbars, and for dialogues.
Choose a sensible size for the dialogue font or your dialogues may grow bigger than the window.
Choose patterns and colours for workspace backgrounds, select colours for tabs and toolbars, for highlighted menus and toolbar icons. Active and enabled tools will show the highlight background colour.
The text and window colours change the appearance of dialogues and toolbar. To change the appearance of the document use the Accessibility options`and override the document colours.
Fullscreen Mode
If you just want to concentrate on reading, enter the fullscreen mode (F11). Even with the toolbars off, you can switch to other documents with Control Tab, and use the Pan and Zoom Window to navigate the current document. Press Escape to exit from fullscreen mode.
Fullscreen mode was added to the Editor in version 5.5.309.0, but Next/Previous document shortcuts do not work in the Editor.
Tiling, N-up, and Booklet Printing
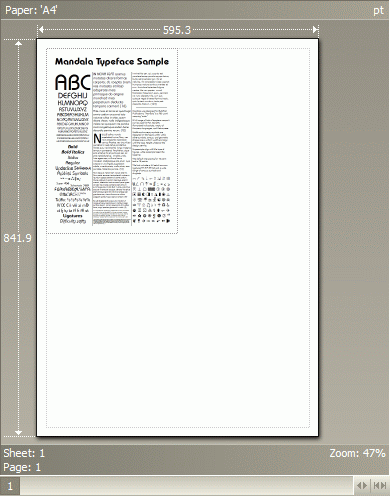 Large documents can be tiled onto several
sheets. For example, scale an A4 document up by about 187% and print it on four
sheets. This powerful feature makes it easy to produce posters from the same
standard document used for handouts.
Large documents can be tiled onto several
sheets. For example, scale an A4 document up by about 187% and print it on four
sheets. This powerful feature makes it easy to produce posters from the same
standard document used for handouts.
The illustration shows the preview for tile 4 of 4 from an A4 page scaled to 187% with a 4.9 pt overlap between tiles. Click on the image to show all four tiles.
N-up printing allows printing of multiple copies on a single sheet. The document will automatically be scaled down to fit 2, 4, 8 or a custom number of copies onto a single sheet.
The document can be rotated automatically to use the sheets more efficiently.
Booklet printing will automatically arrange a multipage A4 portrait document for printing as an A5 booklet on A4 landscape.
Export as Image
Export any document to a Multipage TIFF image, or to any of the popular image formats — PNG, GIF, JPG PCX, or BMP — and some formats I am not familiar with. Set the resolution to 72 dpi or 2,400. Change the page background colour or make it transparent. Automatically assign file names to the images with variables. This very powerful feature is available even in the free version of the Editor. I used it to export 12 pages of my PDF Calendar to 12 JPG images to use as thumbnails on my News Page. Now all I have to do is to remember to update the thumbnail each month.
.
High Resolution Snapshots
 You can change the
default resolution for snapshots from Edit, Preferences, Snapshot Tool, Use Fixed Resolution for snapshot images, to print quality
resolutions of 300 or 600 dpi (and up to 2400 dpi) instead of using low screen
resolution of 72 or 96 dpi. Then, whenever you use the snapshot tool a high
resolution bitmap is copied to the Windows clipboard. This is useful when you
wish to capture fine detail from a PDF file. The same resolution is used when
you take a snapshot from the Loupe Window or the Pan and Zoom Window.
You can change the
default resolution for snapshots from Edit, Preferences, Snapshot Tool, Use Fixed Resolution for snapshot images, to print quality
resolutions of 300 or 600 dpi (and up to 2400 dpi) instead of using low screen
resolution of 72 or 96 dpi. Then, whenever you use the snapshot tool a high
resolution bitmap is copied to the Windows clipboard. This is useful when you
wish to capture fine detail from a PDF file. The same resolution is used when
you take a snapshot from the Loupe Window or the Pan and Zoom Window.
The options also allow the snapshot to be greyscale. A sound can be played and/or the selected region can flash to confirm that a snapshot has been taken. Either or both options can be disabled.
Navigation of Views
You can navigate back and forth between different views on the same document. This is very useful for finding your place again after searching for something elsewhere in the document. The shortcuts Alter Left Arrow and Alter Right Arrow are sensible and therefore easy to remember.
 Users
with a middle mouse button can scroll quickly through long documents in
continuous mode, or scroll in any direction when zoomed
in to view a detailed drawing, for example. Click the middle mouse button to
place the scroll anchor anywhere on the page, then drag in any direction.
Scrolling long documents is fast and smooth, with excellent control.
Users
with a middle mouse button can scroll quickly through long documents in
continuous mode, or scroll in any direction when zoomed
in to view a detailed drawing, for example. Click the middle mouse button to
place the scroll anchor anywhere on the page, then drag in any direction.
Scrolling long documents is fast and smooth, with excellent control.
Remember Previous View
PDF-XChange remembers the previous view of each document. On reopening a document, whether from Windows Explorer or from the recent files menu, it reopens at the same place as last time, and at the same zoom level. This is a huge time saver. I wish all of my favourite programs had this feature. Open at last editing position is available in OpenOffice, and open fonts from last time is an option FontCreator, but a similar feature is not yet available in MainType or PagePlus.
Customise Recent Files List
 Favourite
files can be pinned to the Recent Files list, and recently opened files can be
deleted from the list. In the Viewer, the maximum number of files on the list
can be set in Preferences, General, at a very generous limit of up to 200 files.
In the Editor, there doesn’t seem to be a limit to the number of recent files
remembered. The number of pinned and recently opened files is shown on the Open
file fly-out.
Favourite
files can be pinned to the Recent Files list, and recently opened files can be
deleted from the list. In the Viewer, the maximum number of files on the list
can be set in Preferences, General, at a very generous limit of up to 200 files.
In the Editor, there doesn’t seem to be a limit to the number of recent files
remembered. The number of pinned and recently opened files is shown on the Open
file fly-out.
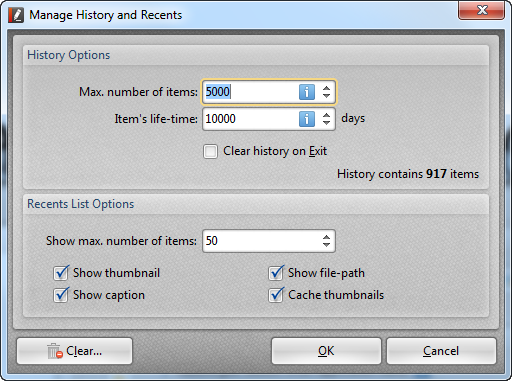 Recently
opened files can be managed via a button to open this dialogue in Edit,
Preferences, Documents. The number of files retained in history, and/or the
duration in days to keep them in history can be set. The number of files to
display on the recent files list can also be set here.
Recently
opened files can be managed via a button to open this dialogue in Edit,
Preferences, Documents. The number of files retained in history, and/or the
duration in days to keep them in history can be set. The number of files to
display on the recent files list can also be set here.
In the Viewer, there is also a button in preferences to clear the list. This brings up a confirmation dialogue where you can clear the entire list, or leave just the pinned files (the default). The most productive method may be to keep the number of files fairly low, and to pin the files that you need to open frequently.
In the Viewer, you can reopen all files that were previously open in the viewer when restarting. The setting is on the General Tab of Preferences. The Editor forgets the last session.
In the Viewer, Manage Recent Files list lets you move pinned files to the top of the list, show extended tool-tips (with previews), set the confirmation before clearing the list, clear the list on exit, and if any recently opened files have been deleted, they can be cleared from the list automatically by checking the option to remove all broken items on startup.
Browser Plug-in
 The screen shot
shows a PDF file in an Opera 12.16 tab (resized to fit this page). The toolbars
can be enabled or disabled from the view menu, or collapsed by clicking the
little arrows.
The screen shot
shows a PDF file in an Opera 12.16 tab (resized to fit this page). The toolbars
can be enabled or disabled from the view menu, or collapsed by clicking the
little arrows.
The external PDF-XChange Viewer has the added convenience of the multiple document interface. However, if you just want to open one or two PDF files from the Internet and display them directly in your browser, the plug-in is a neat way of doing this, and you still have access to all the comment and markup tools.
The plug-in can be customised independently and the custom settings can be exported/imported from the Edit menu.
If you open a file in your browser, then change your mind and wish to open it an external PDF viewer, you can do this from the icon at the bottom right on the Launch toolbar. If Foxit Reader and/or Adobe Reader are installed you can choose one of those instead of PDF-XChange Editor. This can be useful, if, for some reason, a PDF file doesn’t display as expected.
The Browser Plug-in is quite broken in Opera 11.64 on Windows 64-bit, but it is OK in Opera 12.16 or the new Opera Blink versions.
A Note on Memory Use
PDF-XChange uses considerably more memory than Foxit Reader, but less than Adobe Reader. Many misinformed PC users complain about high memory use of programs, so we need to point out a few facts about memory use.
Using more memory is good, not bad. If your PC has lots of memory it can be used to cache pages and make the viewer display pages faster. The important point is that if other applications request memory the viewer should release it.
In theory, PDF-XChange can use up to 240 Mbytes on a 1 Gigabyte system, but it doesn’t matter if that improves performance. When scrolling and zooming large documents the action is smooth and almost instantaneous. In Foxit Reader there is a noticeable jerkiness. Adobe Reader’s performance is better than Foxit Reader’s, but not as smooth as the performance in PDF-XChange. By default, PDF-XChange will use a maximum of 25% of available memory. Users can change this in Preferences, Performance to between 10% and 75%
If you want to use other applications, but keep PDF-XChange open, just minimise it. Memory use will drop immediately below 2 Mbytes. There is also an option in Preferences, General, to minimise it to the system tray. This removes the icon from the start bar, but memory won’t be released immediately. After some time of not being used, the memory usage will drop, but not as low as if you don’t use this option. Either way, it won’t affect performance unless your system runs out of free memory and starts using the Windows swap file.
Conclusions
PDF-XChange Viewer has reached the end of its development and is now replaced by the Editor, which is still free to use except for Pro features. Both are faster than Adobe Reader, and the Editor is faster than the Viewer. The Viewer still has some features that the Editor lacks, or that are not free in the Editor. For the most commonly used features there are no banners, no watermarks on documents, and no limitations or restrictions.
There is also a support forum where the developers respond promptly to any problems. Bugs are usually fixed quickly with frequent updates.
This one is a keeper. Download it now. You may never open Adobe Reader again unless you need to open some special PDF files. If you regularly work with large numbers of documents I recommend avoiding Adobe Reader. On old hardware it is so slow as to be almost unusable.
The Editor is now able to supersede the Viewer. Most features are back, and there are many features in the Editor absent from the Viewer. I recommend using the Editor as your default program for PDF files.